Client-side JavaScript testing is still pretty young in 2015, partly due to the overhead required before you can actually get tests running. From learning all the individual tools that work together to restructuring your code so it can actually be tested, it could be a while before you get up and running. Hopefully this guide will make things a little bit easier.
What is client-side testing and coverage?
Client-side tests are tests you write for code that runs primarily in the browser. “Code coverage” describes how well your code is tested. In other words, do your tests run through every if/else block and switch case? Even with your code instrumented for coverage, it’s possible to have 100% coverage without actually catching every opportunity for error. It’s important for you to decide what actually needs to be tested, try to cover possible edge cases, and start from there. Coverage makes for better tests and tests make for better code! In most cases, honest test coverage (covering the crucial parts of your application that should be definitely be tested), will be the best coverage, regardless of whatever percent your coverage tool tells you.
It might be worth noting that this is not a tutorial on any specific type of methodology such as TDD vs. BDD, integration, unit, etc. Rather, it should serve as a general guide for making sure your code works as expected. If you are familiar with any of the various testing methods, you will probably notice this will be a combination of a few.1 After all, the end goal is to make sure things don’t break; when things do break, it should be easy enough to add another test.
Decide what’s important to test
If you’re starting to write new code, there are plenty of ways to write the accompanying tests. Some people believe in writing the tests first, having them fail, and then writing the code to make them pass. Some write tests after the code is already written. Personally, I do a mix of both: write out sentences describing the tests that needs to be written while I’m writing code. Sometimes I will have a higher level knowledge of what the piece of code is supposed to do, so I’ll write a few sentences in the beginning, and then as I’m writing code, I’ll fill out more sentences pertaining to certain functions or cross functionality within the module. Find out what works best for your development process.
If you’re starting to write tests from an existing code base, then good for you. I admire your courage! After making sure your code is testable, I’d suggest keeping these three points in mind:
Start with crucial features
This might seem like a no-brainer, but decide what’s crucial to you. It might be a feature that makes you the most money or it might just be something that breaks all the time and you finally want to put an end to it. Either way, you’ll have to start somewhere.
Set a target amount of coverage for each test suite
Coverage is supposed to tell you how well your tests are written. While this can be mildly ambiguous, setting a certain minimum percentage of coverage won’t hurt and ensures a certain level of thoroughness when writing your tests. If someone, including yourself, changes the code later, it’s possible that the coverage percentage will drop and your test suite fails. This just means a test suite or case might need to be altered or added. Welcome to the world of regression testing!
Teach your fellow developers how to test!
Ah, yes. The initial inspiration for this blog post was to make JavaScript testing more of a thing within our codebase. Not everyone is a JavaScript Jedi when it comes to writing tests or even JS for that matter, so it is your job to teach the young Padawans.
Testing tools
First, let’s look at some tools that will be used throughout this guide. Knowing the role of each tool will help you understand what each does. You can decide for yourself whether or not it is essential for your workflow.
Grunt
Grunt is a task runner. Tasks could be anything such as minifying and concatenating assets, creating a local server, or watching files for changes.
Mocha
Mocha is our framework of choice that takes care of running our test suites. Normally after installing Mocha you would run tests for your node server-side code. In our case, our goal is to emulate the browser tests within the command line so we can integrate the test results in our continuous integration system. For this, there is a browser variation that just requires you to include the mocha.js and mocha.css in an HTML file in addition to your test suite and test file. If you just need to view the test results in the actual browser, then congratulations, you can stop here!
Chai
Chai adds syntactic sugar to your assertions, some utility functions, as well as a plugin interface for any necessary tweaks you might want to build. It is framework agnostic, so you don’t need to use it with Mocha specifically. After using Chai and Mocha together for some time now, I sometimes forget where the line is between the two because they mesh so beautifully.
Por ejemplo:
Instead of saying something like assert.equal(2 - 1, 1), you can write your assertions like, expect(2 - 1).to.equal(1).
This makes your assertions more expressive and clearer to see what’s being tested. Chai’s utility functions allow you to be even more expressive when describing object properties, instance types, etc.
Remember: when testing functions that throw errors, you’ll want to pass the function reference or a bound function reference instead of the actual function invocation.
To use Chai in the browser simply add the chai.js file to your test HTML file. If you’re using node, require it as you would any other node module.
Sinon
Sinon is another essential part of our toolbox that provides spies, stubs, mocks, and a few additional useful functions for testing:
- Spies are functions that record how many times they have been called and with what arguments. These are especially useful when testing callbacks:
"test should call subscribers on publish": function() {
    var callback = sinon.spy();
    PubSub.subscribe("message", callback);
    PubSub.publishSync("message");
    assertTrue(callback.called);
}
-
Stubs are like spies but with pre-programmed behavior. Unlike wrapping a function with a spy, when you wrap a function with a stub, that original function is not called. This can be useful for faking AJAX requests where you might not want the actual request to go out. Some valid use cases for stubs are altering flow control or testing a branch of your function that throws an error.
-
Mocks are similar to stubs because they inherit the spy API and discard the original function implementation. In addition to pre-programmed behavior there are expectations you will tell the mock to what to expect and verify, usually before any of the test code is written.
During the tutorial part of this guide, we will also be using the sinon-chai library that gives you the same expressive power for Sinon methods as we gave to our Mocha assertions.
Karma
Karma, formerly Testacular (and thank goodness for formerly) is a test runner. Karma uses your test framework to run tests in various environments of your choice.
A good introduction to Karma can be found in this video by Vojta Jína of the AngularJS team (5:40 gets me every time)
Karma itself doesn’t have a lot of functionality outside of running your tests, so you will probably find yourself installing a couple more Karma plugins to take care extra needs such as code coverage.
Blanket and Istanbul
Blanket and Istanbul are code coverage tools that can instrument your code and tell you just how much of your code your tests run through.2 We will be using the grunt-blanket-mocha plugin in this guide as well, which uses Blanket. In most scenarios, it’s probably more common to use just one of these in your workflow, but we will take a quick look at both a little later.
Restructuring your code
I know there’s a lot of potentially new and crazy tools mentioned above. Things will start to make more sense once we put them together. Now that we’ve gotten a foundational handle on the tools we’ll be using, I should mention that if you haven’t done any testing for your JavaScript yet, it’s possible your code might need a little restructuring.
There are a few common patterns you’ll see around the JavaScript world that are nearly impossible to test. Let’s look at a few:
Anonymous functions
A common thing to do with something like a jQuery click handler would be to write something like this:
$('#some_element').click(function(e) {
    // Do something when clicking on #some_element
});
Having an anonymous function as your event handler makes it impossible to test the individual event handler. In the tests we write, we won’t have a reference to the function passed to the click handler after this code is executed. Being able to reference individual functions is essential for a good test suite.
We can fix this problem by breaking out the anonymous function and giving it a name.
$('#some_element').click(onElementClick);
function onElementClick(e) {
    // Do something when clicking on #some_element
}
Now you can test onElementClick with no problem! You could mock a fake event object and test the code accordingly.
Revealing Module Pattern
The Revealing Module Pattern a common pattern people will use because they want to have private state within their modules/classes. The pattern utilizes an Immediately-invoked function expression, or IIFE, and returns an object that generally serves as a reference to public properties and methods.
var SomeModule = (function() {
    var privateProperty = 0;

    function privateFunction() {
        // code
    }

    // This function will be made public
    // once it is returned below
    function publicFunction() {
        return privateProperty += 1;
    }

    return {
        count: publicFunction
    };
})();
What we now have is SomeModule with a count method and nothing else. The count method is a reference to the internal publicFunction which keeps a reference to privateProperty. This lets us do:
SomeModule.count(); // 1
SomeModule.count(); // 2
SomeModule.publicFunction(); // Error
SomeModule.privateFunction(); // Error
While this provides a solid way of exposing certain methods on your module, it makes the private functions impossible to test individually. Maybe you could test the private functions via the exposed methods that call upon them, but relying on that possibility might not always be good enough. This all depends on what you think should be tested in the end.
In addition, be careful when keeping global state within your modules. For example, with privateProperty, I could have a test suite that looked something like this:
describe('SomeModule', function() {
    it('should return 1 when calling count() once', function() {
        var count = SomeModule.count();
        expect(count).to.equal(1); // passes
    });
    it('should return 2 on the second call of count()', function() {
        var count;
        count = SomeModule.count();
        count = SomeModule.count();
        expect(count).to.equal(2); // Error: expected 3 to equal 2
    });
});
Can you spot the problem with SomeModule above? Singleton patterns will usually have similar problems, but because we can’t create a fresh new instance of SomeModule for each test, we have shared state between the tests. This will cause headaches, false positives, and Armageddon. We want atomic tests, which are hard to write with the way this example module is designed here.
Self initializing functions
At some point during your JavaScript journey you’ll learn about how polluting the global namespace with a bunch of global variables is a bad practice. You might then start to wrap your code in an IIFE and call it a day:
(function() {
    function SomeClass() {
        // code
    }

    SomeClass.prototype.someFunction = function(arg) {
        // code
    }

    // Run my code
    new SomeClass();
})();
There is nothing inherently wrong with the IIFE pattern, but this problem is similar to the click handler situation. Once the browser downloads, parses, and executes the code, the remaining references within the global scope will be the only things left for testing. The above code creates an instance of SomeClass and throws the reference out into the ether we JavaScript folks like to call a closure. We no longer have a reference to SomeClass that we can test, and even if we added it to the window or some global namespace, it would be a reference to an instance of SomeClass and not the actual SomeClass object. It’s better to attach a reference of the SomeClass object to the window or namespace like so:
(function() {
    function SomeClass() {
        // code
    }

    SomeClass.prototype.someFunction = function(arg) {
        // code
    }

    // Export the object to your app's namespace
    // or window if you're in to that.
    window.SomeClass = SomeClass;
})();
With this approach you can safely create an instance of SomeClass and test someFunction.
Dependency Injection
I won’t go into too much detail about this $25 term, but I think it is worth mentioning in terms of thinking about how you write code when you’re planning on testing. In its simplest form, instead of doing something like:
var SomeClass = function() {
    // Initialize a logger instance to use within this class
    this.logger = new Logger();
};
You should instead do something like:
var SomeClass = function(logger) {
    // Pass in the logger instead
    this.logger = logger;
};
There’s nothing wrong with the first example at first glance. We can assume Logger will work for SomeClass as expected. The problem doesn’t arise until you’re starting to write tests. By passing the logger in via an argument instead, we can pass mock objects to SomeClass in our tests to make sure logger is being used, called when it’s supposed to be called, etc. When you see the new keyword used within your functions, you might want to reconsider passing that object via argument. This doesn’t have to be custom objects like a Logger. It could be as simple as new Date() or new RegExp();
Putting it all together
For this tutorial, we will be making a basic calculator module using grunt-mocha-blanket and grunt-karma. Grunt-mocha-blanket is more of a complete package that includes everything you need for testing and coverage with Mocha and Blanket. Grunt-karma requires a few more modules to make things work together. Let’s get started!
Setup with Mocha
Our folder structure should look like this:
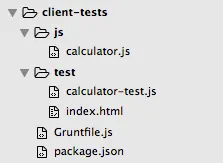
- js/calculator.js – The source file that we want to test
- test/calculator-test.js – The file we will put our test suite in
- test/index.html – An HTML file with our test fixtures. It’s common for your client side code to touch the DOM, so if you need some elements on the page for your code to run, you would add it in here.
- Gruntfile.js – Our grunt file that will hold the config for running our tasks. You should have grunt installed globally on your system already.
- package.json – Holds the info about the project including the node modules we will install via npm
Let’s fill the package.json file the necessary dependencies for our mocha-blanket setup. Mine looks like this:
{
    "name": "client-side-testing",
    "version": "0.1.0",
    "contributors": [
        {
            "name": "Sean Coker"
        }
    ],
    "devDependencies": {
        "chai": "^1.10.0",
        "grunt": "^0.4.5",
        "grunt-blanket-mocha": "^0.4.1",
        "load-grunt-tasks": "^3.1.0",
        "sinon": "^1.12.2",
        "sinon-chai": "^2.6.0"
    }
}
The important part of this JSON is the devDependencies. Run npm install from the root directory of the project and watch the node_modules folder get created and filled in with our dependencies. Since we will be referencing files from this folder within our index.html file, let’s fill that file with content. I have annotated it for your pleasure.
<!-- Mocha tests in the browser use unicode symbols for bullet points
so unless you want weird character bullet points, we add this. It doesn't
break anything with or without it. -->
<meta charset="utf-8">
<link rel="stylesheet" href="../node_modules/grunt-blanket-mocha/node_modules/mocha/mocha.css">
<!-- This is where mocha inserts the test results that are styled with the css file above -->
<div id="mocha"></div>
<!-- This is where any fixtures we need for the test will be inserted into. Naturally, we won't want to cover the mocha test results so we position this bad boy off screen. -->
<div id="test" style="position: fixed; top: 0; left: -99999px;">
</div>
<!-- We need to insert our testing dependencies here -->
<script src="../node_modules/chai/chai.js"></script>
<script src="../node_modules/sinon-chai/lib/sinon-chai.js"></script>
<script src="../node_modules/sinon/pkg/sinon.js"></script>
<script src="../node_modules/grunt-blanket-mocha/node_modules/mocha/mocha.js"></script>
<script src="../node_modules/grunt-blanket-mocha/node_modules/blanket/dist/mocha/blanket_mocha.js"></script>
<script src="../node_modules/grunt-blanket-mocha/support/mocha-blanket.js"></script>
<!-- We will using BDD-style assertions. See Mocha documentation for more info -->
<script>mocha.setup('bdd');</script>
<!-- The source file we will be testing! Don't forget the data-cover attribute so Blanket will know which file will need to be instrumented for coverage. -->
<script src="../js/calculator.js" data-cover></script>
<!-- Our test suite needs to be after the source file, of course -->
<script src="calculator-test.js"></script>
<script>
// For Blanket add coverage in our Mocha CLI tests (node environment),
// we need to add this reporter
if (window.PHANTOMJS) {
   blanket.options("reporter", "../node_modules/grunt-blanket-mocha/support/grunt-reporter.js");
}
// If we're in in the browser
else {
   mocha.run();
}
</script>
Since we’ll be making a calculator, we can start off our test suite with a few statements about what we want before we even start. Let’s describe one of the more basic operations of a calculator, addition. In calculator-test.js I’ve commented around the preliminary test statements.
// With Mocha we want to describe the module/component/behavior we are testing
// with a describe block - describe('Component', function() { })
describe('Calculator', function() {
// Now we describe the adding behavior of the calculator module
describe('Adding', function() {
// What should it do?
it('should throw an error if a non-numeric value is used');
// Mocha's `it` functions takes a string for the first argument and
// and a function for the second argument. These tests are considered
// pending without the function argument
it('should throw an error if less than 2 values are provided');
// I want to be able to pass any number of arguments to the calculator's
// soon-to-be-created add function
// i.e. calculator.add(1, 2, 3, 4) should return 10
it('should add a series of number arguments together');
});
// describe('Subtraction', function() {
// @todo
// });
});
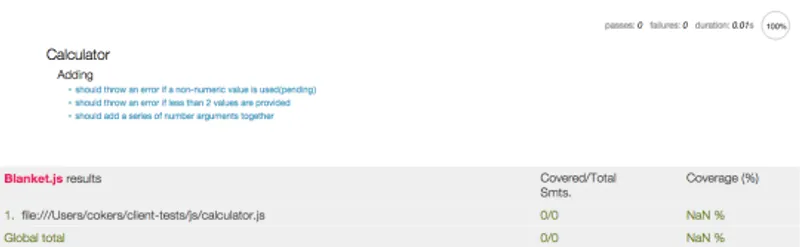
If we open the index.html file in the browser, you will notice our pending tests in blue. Cool!
Let’s fill those tests in:
describe('Calculator', function() {
   // Mocha's before() function runs once before the rest of the tests start
   // Mocha also comes with after, beforeEach and afterEach
   before(function() {
        // Create a new instance of our Calculator module to be used in
        // each `it` test case within the 'Calculator' describe block
       this.calculator = new Calculator();
   });

   describe('Adding', function() {
       it('should throw an error if a non-numeric value is used', function() {
            // Chai's expect function will take any value, including a function
            // but in our case, we want it to throw an error. If we just said
            // this.calculator.add(2, 'a'), the error would throw before `expect`
            // could handle it. This is why we create a new function using bind
            // passing in our specified arguments and let Chai catch the error.
            expect(this.calculator.add.bind(this.calculator, 2, 'a')).to.throw();
       });

       it('should throw an error if less than 2 values are provided', function() {
           expect(this.calculator.add.bind(this.calculator, 2)).to.throw();
       });

       it('should add a series of number arguments together', function() {
            // This test case reads exactly how you would expect
            expect(this.calculator.add(2, 5)).to.equal(2 + 5); // passes
       });
   });
});
If you noticed the blanket report at the bottom of the page in the previous screenshot, you would have seen there’s some sort of error with the blanket coverage having NaN %, in which case, you’ll probably need a bigger blanket. Opening up the console should reveal an error from blanket requesting our calculator.js file. That is because you can not perform cross-domain requests which is what is happening when viewing index.html on the file:/// protocol. Fortunately there’s a simple solution. If you’re on a Unix system, run python -m SimpleHTTPServer from your project’s root directory. This will start up a local web server defaulting to port 8000. Now when you hit http://localhost:8000/ in your browser, you should see something like:
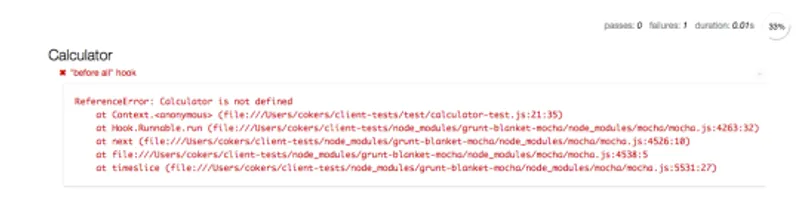
Mocha outputs a stack trace of any errors. At the top of the output, you’ll notice Calculator isn’t defined. This is your chance to take the initiative and fill out calculator.js so that the tests pass. Here’s what I have:
function Calculator() {}

Calculator.prototype._filter = function(values) {
    var len = values.length,
        filtered = values.filter(Number);

    // We could also not throw an error and just return
    // `filtered` if we wanted to.
    if (len !== filtered.length) {
       throw new Error('All values must be numeric');
    }
    return values;
};

Calculator.prototype.add = function() {
    var values = this._filter([].slice.apply(arguments));

    if (values.length < 2) {
        throw new Error('Add expects a minimum of 2 arguments but ' + values.length + ' given.');
    }
    return values.reduce(function(a, b) {
        return a + b;
    });
};
Save that file and refresh your browser. The mocha output should look something like this:
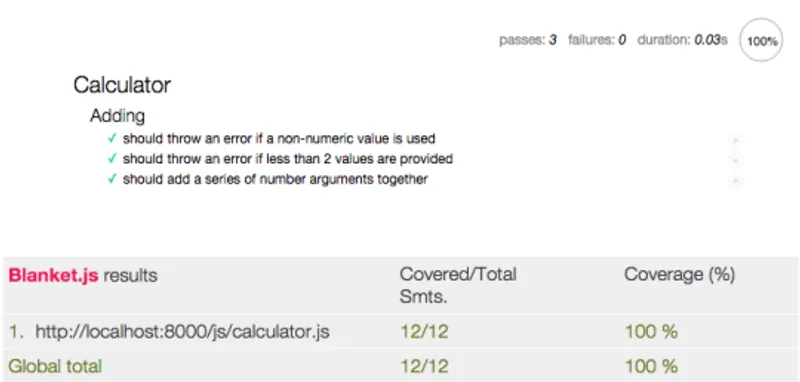
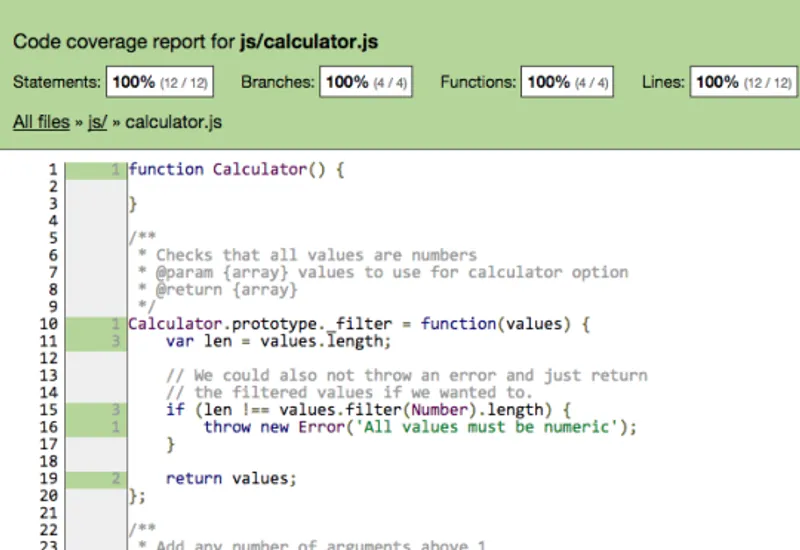
Congrats! You’ve successfully written tests for your JavaScript and reached 100% coverage.
Now let’s say you wanted to see if certain functions were being called at certain times. For example in our add function (and future arithmetic operator functions) we want to use the filter function to filter out non numeric arguments. This is a perfect opportunity to use a spy.
// All functions like add, subtract etc, should filter the non-numbers
// before operating on them. We can check to see that the filter was called
// using a spy
it('should filter the input', function() {
    // Create spy on the filter function to make sure it was called.
    // We could create a stub here as well and it will be called,
    // but using a stub means the actual filter function doesn't get
    // called upon which would make add() fail.
    var filterSpy = sinon.spy(this.calculator, '_filter');
    this.calculator.add(2, 5);
    // Chai + Sinon here.
    expect(filterSpy).to.have.been.called;
    // When creating a spy or stub to wrap a function, you'll want
    // to make sure you restore the original function back at the
    // end of your test case
    filterSpy.restore();
});
With Sinon, you can record the arguments functions were called with, if the function was called, and in what order. Here we’re simply just making sure _filter was called.
If all you need in terms of testing is the results in a browser, then you can stop here. More often than not, these tests are a part of some command-line process whether it be local or incorporated within a continuous integration system like Jenkins or Travis. Let’s take a look at running these tests headlessly.
Mocha CLI
Since we’re using Grunt to run through all of our three tests, we’ll need to configure it to know what files need to be tested with our grunt-blanket-mocha plugin. Your Gruntfile will look something like this:
module.exports = function(grunt) {
    'use strict';

    // Load the plugins that provide the tasks we specified in package.json

    require('load-grunt-tasks')(grunt);
    grunt.initConfig({
        blanket_mocha: {
            options: {
                run: true,
                reporter: 'Min',
                // We want a minimum of 70% coverage
                threshold: 70
            },
            files: {
                src: 'test/*.html'
            }
        }
    });

    grunt.registerTask('default', ['blanket_mocha']);
};
Save your file and run grunt from the root directory of the project. That will run the default task which is composed of just blanket_mocha as of now.

Surprisingly enough, we get 1 passing test and 2 failing. We had everything passing with flying colors in the browser, but the command line reports otherwise. The solution is simple enough. We just need a polyfill.3 Adding following above the describe block in calculator-test.js should do the trick.
if (!Function.prototype.bind) {
    Function.prototype.bind = function() {
        var fn = this,
            args = Array.prototype.slice.call(arguments),
            context = args.shift();
        return function() {
            fn.apply(context, args);
        };
    };
}

describe('Calculator' ...)
There is also a more comprehensive polyfill at MDN. Rerun your tests with grunt and things pass as expected. The issues we run into with our JavaScript across browsers, can also happen with our tests as well. Luckily Karma is here to save the day.
Karma
Let’s get started with Karma by first installing some packages from NPM:
npm install --save-dev grunt-karma karma-chrome-launcher karma-coverage karma-firefox-launcher karma-html2js-preprocessor karma-mocha karma-phantomjs-launcher
That’s a mouthful. Here’s what’s getting installed:
- grunt-karma – This is Karma.
- karma-chrome-launcher – This allows Karma to test in the Chrome browser.
- karma-coverage – Gives Karma test coverage functionality with istanbul.
- karma-firefox-launcher – Lets Karma test in the Firefox browser.
- karma-html2js-preprocessor – Converts our HTML fixtures to a JS string that Karma can use in our Mocha tests.
- karma-mocha – Lets Karma use Mocha as the test Framework.
- karma-phantomjs-launcher – Lets Karma run tests with PhantomJS.
Now that we’ve got everything we need to run our tests with Karma, let’s starting configuring the task in Grunt. Add the karma target under our already configured blanket_mocha target.
grunt.initConfig({
    // We already did this part
    blanket_mocha: { ... },
    karma : {
        options: {
            // Configuration options that tell Karma how to run
            configFile: 'karma.conf.js',
            files: [
                // These files are probably going to be included in
                // all our tests that we'd write. The files object in
                // each individual karma target are added to these.
                'node_modules/chai/chai.js',
                'node_modules/sinon-chai/lib/sinon-chai.js',
                'node_modules/sinon/pkg/sinon.js',

                // In our case, the test and src files are the
                // same for the dev and prod targets so we can include
                // them in the global files option here
                'js/calculator.js',
                'test/calculator-test.js',

                // html2js preprocessor takes this file and converts it
                // to a string in our JS when the tests run.
                'test/index.html'
            ]
        },

        dev: {
            // On our local environment we want to test all the things!
            browsers: ['Chrome', 'Firefox', 'PhantomJS']
        },

        // For production, that is to say, our CI environment, we'll
        // run tests once in PhantomJS browser.
        prod: {
            singleRun: true,
            browsers: ['PhantomJS']
        }
    }
});
You’ll notice karma expects its own configuration file in the same directory as the Grunfile, which is commonly named, karma.conf.js. This is what that will look like:
module.exports = function(config) {
    config.set({
        // base path that will be used to resolve all patterns (e.g. files, exclude)
        basePath: '',

        // frameworks to use
        // available frameworks: https://npmjs.org/browse/keyword/karma-adapter
        frameworks: ['mocha'],

        // list of files / patterns to load in the browser
        files: [],

        // list of files to exclude
        exclude: [
        ],

        // preprocess matching files before serving them to the browser
        // available preprocessors: https://npmjs.org/browse/keyword/karma-preprocessor
        preprocessors: {
            'test/*.html': ['html2js'],
            'js/*.js': ['coverage']
        },

        // test results reporter to use
        // possible values: 'dots', 'progress'
        // available reporters: https://npmjs.org/browse/keyword/karma-reporter
        reporters: ['progress', 'coverage'],

        // web server port
        port: 9877,

        // enable / disable colors in the output (reporters and logs)
        colors: true,

        // enable / disable watching file and executing tests whenever any file changes
        autoWatch: true,

        // start these browsers
        // available browser launchers: https://npmjs.org/browse/keyword/karma-launcher
        browsers: [],

        // Continuous Integration mode
        // if true, Karma captures browsers, runs the tests and exits
        singleRun: false,

        // level of logging
        // possible values: config.LOG_DISABLE || config.LOG_ERROR || config.LOG_WARN || config.LOG_INFO || config.LOG_DEBUG
        logLevel: config.LOG_INFO,

        coverageReporter: {
            dir: 'test/coverage',
            // Force the use of the Istanbul instrumenter to cover files
            instrumenter: {
                'js/*.js': ['istanbul']
            },
            reporters: [
                // reporters not supporting the `file` property
                { type: 'html', subdir: 'report-html' },
                { type: 'lcov', subdir: 'report-lcov' },
                // reporters supporting the `file` property, use `subdir` to directly
                // output them in the `dir` directory
                { type: 'lcovonly', subdir: '.', file: 'report-lcovonly.txt' }
            ]
        }
    });
};
If you’re using any HTML fixtures you’ll need to know one more thing. In the before function in calculator-test.js you’ll need to have the HTML be injected into the body when the tests run. The before function should now look like:
before(function() {
    // Karma creates this global __html__ property that will hold all
    // of our HTML so we can populate the body during our tests
    if (window.__html__) {
        document.body.innerHTML = window.__html__['test/index.html'];
    }
    this.calculator = new Calculator();
});
This will ensure that before any of your tests run, you will have the appropriate markup for your tests.
Run grunt karma:dev and let Karma do its magic. It should start up Chrome and Firefox and run tests in the browsers as well as in PhantomJS.
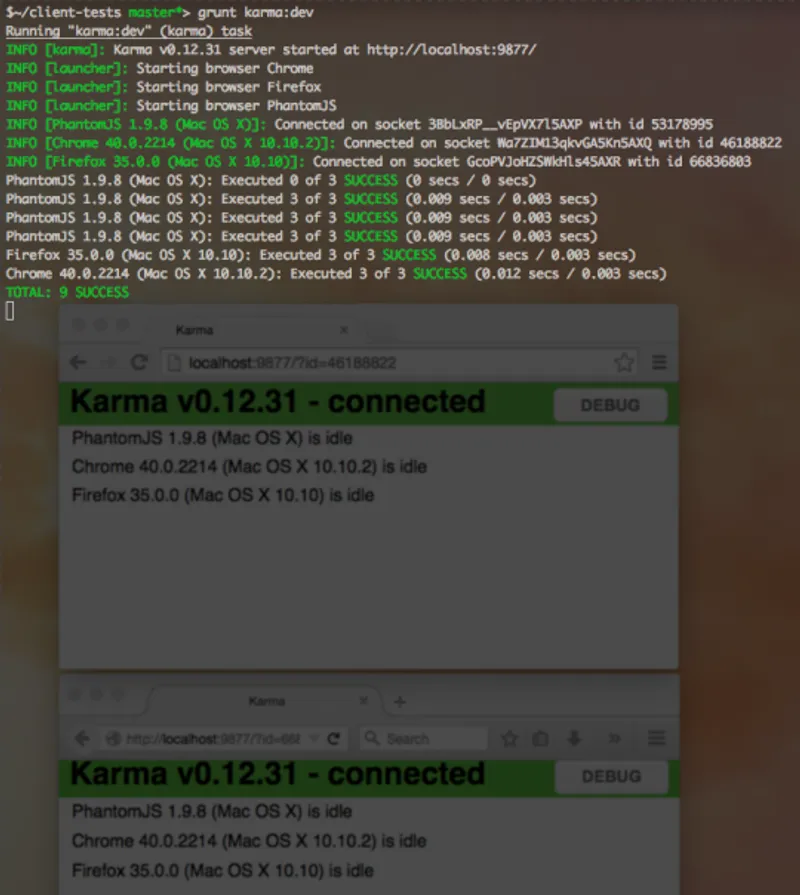
One of the best things about this tool is that it runs your tests in an actual browser and not some sort of VM. Also you’ll notice with this command running, you can write more code, more tests, and Karma will notice when something has changed. It will then proceed to run your tests with each save so you can comfortably write code knowing whether or not your tests are passing. This keeps your personal workflow essentially the same as before, similar to any watch command you would use with any other tool.
Something you might not have noticed is the coverage reports that are also created for you on every save. Check out the coverage directory within the test folder. If you open up the report html page, you can see various reports on your coverage and test code.
Final words
There’s a myriad of other options and plugins that you can tweak and add to Karma. It’s definitely a great tool for your testing toolbox as it can passively make sure things are ok. Mocha, Sinon and Chai are a top-notch trio. Having Karma handle everything else around them puts icing on the cake. Hopefully this guide was helpful. I’ve included the full source code for your perusal here or you can download the zip directly. Happy testing!
Slides from the Vimeo talk.
-
Personally, I think this method works a little better in the end since you will usually want to have different types of tests anyway.
-
As of right now, it seems as if the karma-coverage plugin uses Istanbul under the hood.
-
PhantomJS < 2.0 uses an older version of Webkit that doesn’t implement bind.