People ask me all the time, “What is the difference between Photoshop and Illustrator?” After trying to use correct terminology and explain the difference between a vector-based and raster/bitmap-based program, I usually end up saying something about how the images you normally work with in Photoshop become “pixel-y” when stretched, whereas the graphics usually created in Illustrator can be stretched or scaled down to any size. Sometimes if the person isn’t snoring at this point, I’ll even mention it’s because the sharp corners and smooth curves that make up the graphics in Illustrator are created with mathematical formulas. That always gets them.
Different in the way that it’s used in Photoshop, the pen tool is one of the most important tools in Illustrator and it’s really simple to use once you get the hang of it.
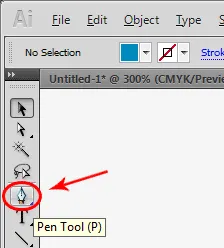
Grab the Pen Tool or press P.
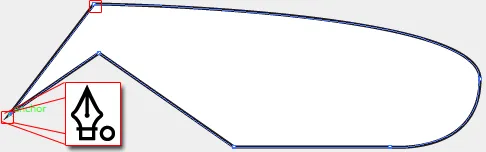
The image below shows square #1 – #3 which represent single mouse clicks which create anchor points. Square #4 represents a mouse click/anchor point as well, except this time, you drag up to the circle. This creates what is called a bezier curve.
Note: When clicking around with the pen tool, you can hold Shift to constrain your paths to 45 and 90 degree angles
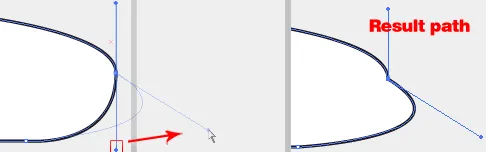
By default after making a bezier curve, the next point you click will curve depending on where you click in relation to the starting anchor point of the first curve. For this example, I’m just going to create to more anchors to close the path. You will know when you’re about to close the path when you hover over the first point and the pen cursor with a circle displays.

Now if you grab the selection tool (black arrow) or press V, we now have an object that we can drag around.
Note: Pressing
Dmakes your fill and stroke the default colors of white and black respectively. Pressing theXkey swaps the fill and stroke back and forth from top to bottom. PressingShift + Xswitches the colors of the fill and stroke.
You will hardly ever trace your desired path correctly on the first try and thankfully there are ways to fix/edit your path after it is already closed. If your object is not already selected, select it with one of the arrow tools and then switch back to the pen tool. You can edit certain points by holding CTRL which temporarily turns your pen to a direct selection tool. Selecting points connected to a bezier curve with the direct selection tool will show you handles, which you can then use to edit the curve.
With the pen tool still selected, holding ALT will temporarily give you the convert anchor tool which can work just like the direct selection tool when grabbing handles. The difference is that you can use the convert anchor tool to grab a vertex on the path and “convert” it to a bezier curve with handles that you can edit as we did previously. If you need to select the convert anchor tool manually, you can hold down on the pen tool in the docked panel and select it there. However, learning the shortcuts to turn your pen into these essential path editing tools can greatly increase your productivity.
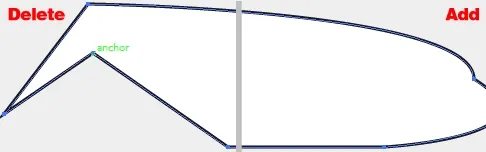
The last two faces of the pen tool are the add anchor point tool and the delete anchor point tool. You can also access these tools by holding down on the pen tool in the dock, however that shouldn’t be necessary. By default, if you hold your pen tool over a selected path, you will see a plus sign appear next to the pen cursor. If you hover over an anchor point, a minus will appear. By deleting an anchor point, the outside points connect. By adding a point, it gives you another anchor to manipulate illustrated below.
With these techniques under your belt, you should be able to pen around anything from logos to fully illustrated drawings.